This helps to keep the papers intact, systematize them for storage in the office, transfer to the archive or send to various government agencies (for example, for verification or as reporting). As a rule, this procedure is required for accounting, personnel, notarial, statutory and other types of documentation.
Before taking up a thread with a needle, it is necessary to clarify the rules and requirements for the formation of a case for a certain situation. If the documents are sewn incorrectly, the archive, state institution or other organization may simply not accept them.
These steps need to be done regardless of the type of firmware selected.
First of all, check all the papers for the necessary signatures and seals. Make sure there are no staples, clips, or paper clips left on them. Put all the sheets in the correct order and count them. In some cases, you will need to additionally number them, make a cover and make an inventory. So check in advance with the organization where you will submit the documents, the list of requirements for registration.
Try to fold all the sheets carefully, otherwise the pack will look ugly, and the pages that have escaped will crumple.
You can stitch documents using a minimal set of tools. By the way, get a separate box for him, so that, if necessary, everything you need is at hand. You will need:
This is the easiest and fastest way.
Step back 10 cm from the top and 1-2 cm from the left edge of the document. Make a hole through the entire stack of papers with a thick needle or awl, and then another 6-10 cm lower. It is even more convenient to use a hole punch.
Cut a thread 20-30 cm long, thread it through the holes on the front side and tie it with a strong knot on the inside. Cut out a rectangle of paper about 2x8, 3x5 or 5x6 cm in size (depending on the type of documentation and the requirements of the host organization). Stick it on top of the knot and the ends of the threads.
On the glued rectangle, write "All stitched and numbered", specify the total number of sheets in numbers and in words in parentheses. Put the signature with the transcript so that it goes a little beyond the edges of the rectangle. And if necessary, also put a seal.
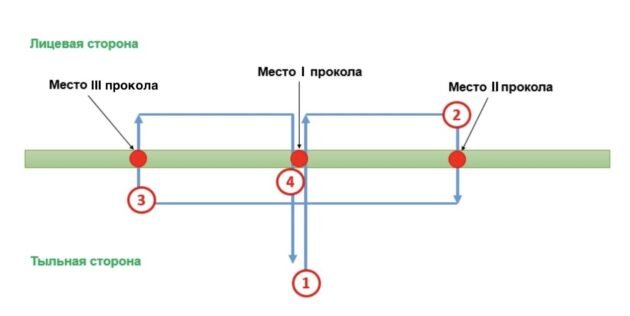
Make 3 holes in the stack of documents, retreating 1-2 cm to the left and 12 cm from the top. The distance between the punctures should be about 3 cm. They can be made with a needle or an awl, and if there are a lot of papers, a hole punch will come to the rescue.
Thread the needle and start stitching the documents from the back. The starting point will be the central hole, and then guide the needle according to the specified scheme.

Tighten the threads so that they tightly pull the sheets together and tie them into a knot. Then stick a rectangle of paper with a size of 2x8, 3x5 or 5x6 cm on top (depending on the type of documentation and the requirements of the host organization). Make a certification inscription on it and specify the number of stitched sheets, substitute a signature with a transcript and, if necessary, the seal of the organization.
This method will be especially useful if you need to sew a thick bundle of documents. The threads will securely hold the sheets along the entire height like a book.
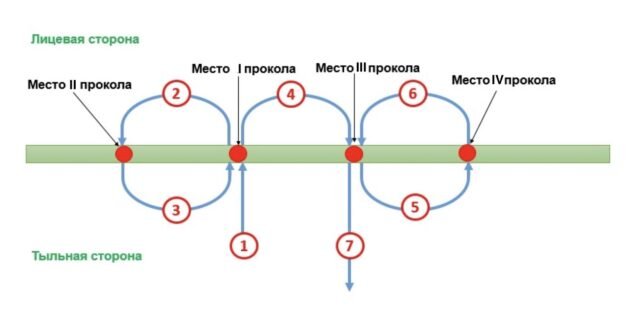
Step back from the top of the document 2 cm and 1-2 cm on the left. Make one puncture with a needle or awl, and then three more, moving down in 8 cm increments, or use a hole punch.
Cut a thread at least 50 cm long and thread it into a thick long needle. Start stitching the stack from the back and follow the pattern drawn in the picture.

Tie the ends of the threads in a tight knot on the back side. Glue a rectangle of paper about 2x8, 3x5 or 5x6 cm on top. On it, specify how many sheets are stitched, put a signature with a transcript and a seal, if necessary.